

Writing your name on your planner can be super stressful! What color do you pick? How thick do you want the lines? What happens if you mess up?!
I couldn’t be happier to tell you that you don’t need perfect handwriting or a huge assortment of markers and pens to write on your planner cover.

Enter Canva! Canva is a popular free design software that now has the capability to upload .pdfs.
So now you can take the printable designs you have purchased in our store and customize them to your heart’s delight!
Watch the video below or scroll down for step-by-step instructions.
Instructions:
First: Choose a printable planner cover design.
-
 “Just Start” Preppy Green Printable Happy Planner Cover$3.25
 -
 Navy and White Stripe Preppy Bloom Classic Happy Planner Cover | Happy Planner Inserts | Happy Planner Classic | Discbound | Printable Planner Cover$3.25
 -
 Green Stripe Spring Happy Planner Cover | Happy Planner Inserts | Happy Planner Classic | Discbound | Printable Planner Cover$3.25
Then: Download your design.
Now that you have you design on your desktop, let’s begin!
Step 1: Open your .zip file by double clicking on the file.
Step 2: Chose the .pdf file without the crop marks. (If you prefer to print with crop marks, you can add them later.)

Step 3: Click “Create a design”.
Step 4: Click “Import file” – then upload your .pdf file.

Step 5: Click “Text” – Choose “Add a heading” or a text combination.

Step 6: Choose your font.
Step 7: Choose the font size.
Step 8: Choose the color you would like to use. Canva will automatically compile the colors from the design so that you can get a perfect match!

You are ready to download your design!
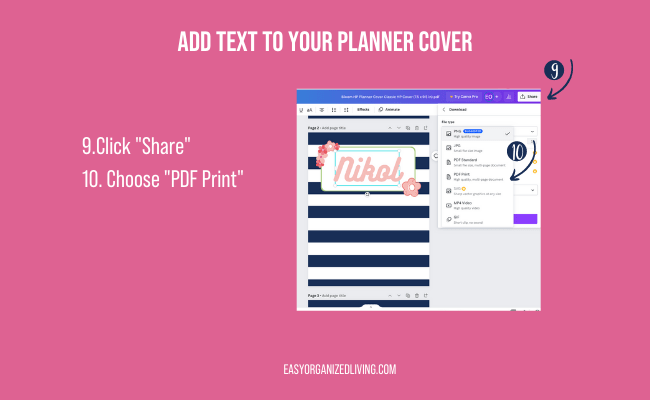
Step 9: Click “Share”.
Step 10: Choose “PDF Print”
Step 11: Choose “Crop marks and bleed” if you would like to add crop marks back onto your design.
Step 12: Choose which pages to download.
Step 13: Click “Done”
Step 14: Click “Download”

Hooray! You now have your very own customized planner cover! No worries about handwriting, matching colors or messing it up!
I would love to see how you make our designs your very own. I know y’all are super creative! Post a picture of your design on Instagram and tag me! @easyorganizedliving
